... the Garden of Eden, almost literally, lies under our feet almost anywhere on the earth we care to step. We have not begun to tap the actual potentialities of the soil for producing crops.
—E.H. Faulkner, 1943
An assessment of the current soil health status on your farm is a good way to begin. By now, you should have some ideas about ways to increase soil health on your farm, but how can you identify the specific problems with your soil, and how can you tell if your soil’s health is actually getting better? First ask yourself why you would do a soil health assessment. The most obvious reason is that it allows you to identify specific problems, such as P deficiency or surface compaction, and to target your management practices as part of the effort to increase overall soil health. A second reason might be to monitor the health of your soils over time after you have made some management changes. Is your soil improving after you started planting cover crops, began a new rotation or switched to reduced tillage? While the goal of building soil health is to prevent problems from developing, it also helps to correct previous problems you might have had. A good soil health assessment done over a number of years allows you to see whether you are going in the right direction. Another reason might be to better value your soils. If they are in excellent health due to many years of good management, your land should be worth more when sold or rented than fields that have been worn out. After all, a healthy soil produces more and allows for reduced purchased inputs. Being able to effectively appraise soil health may be an additional incentive for farmers to invest in good management and build equity in their land.
We can approach soil health assessment at three levels of detail:
- General field observations
- Field assessments using qualitative indicators
- Quantitative soil health tests
General Field Observations
A simple but very good place to start assessing a soil’s health is to look at its general performance as you go about your normal practices. It’s something like wondering about your own performance during the course of a day: do you have less energy than usual? This might be an indication that something isn’t quite right. Likewise, there are signs of poor soil health you might notice as part of the normal process of growing crops:
- Are yields declining?
- Do your crops perform less well than those on neighboring farms with similar soils?
- Does your soil delay water from infiltrating during a downpour?
- When you dig up roots, do they look unhealthy or constrained?
- Does the root system lack mycorrhizal fungi that promote healthy crops?
- Do your crops quickly show signs of stress or stunted growth during wet or dry periods?
- Is the soil obviously compacted? If you use tillage, does it plow up cloddy and take a lot of secondary tillage to prepare a fine seedbed?
- Does the soil crust over easily? Do you observe signs of runoff and erosion?
- Does it take more power to run tillage or planting equipment through the soil?
- Do you notice increased problems with diseases or nutrient stress?
These questions address problems with soil health, and any affirmative answers should prompt you to consider further action.
Field Indicators
The next approach involves addressing the same kind of questions listed above, but in a more detailed manner. In several states, farmers and researchers have developed “soil health scorecards” that are based on observations made in the field. The NRCS has developed a somewhat different visual evaluation system, the Cropland In-Field Soil Health Assessment Worksheet (Table 23.1 is based on this worksheet). The goal of this type of assessment is to help you understand your soil’s health and improve it over time by identifying key limitations or problems.
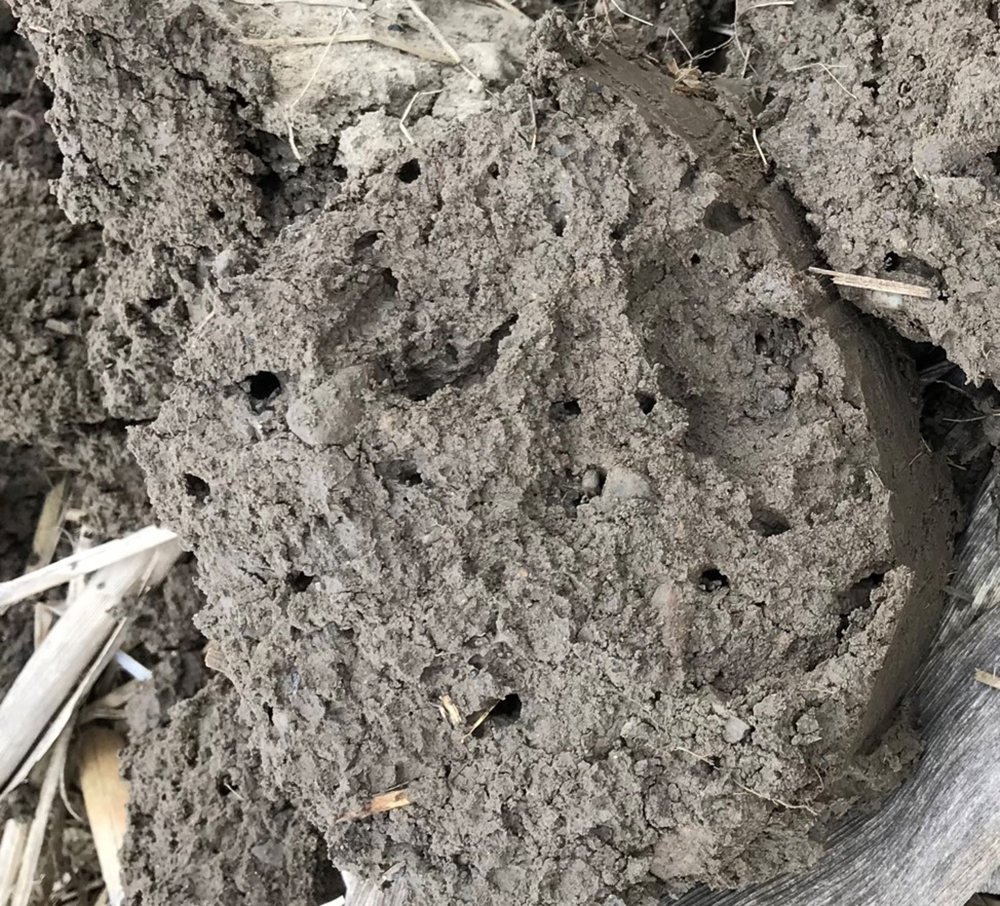
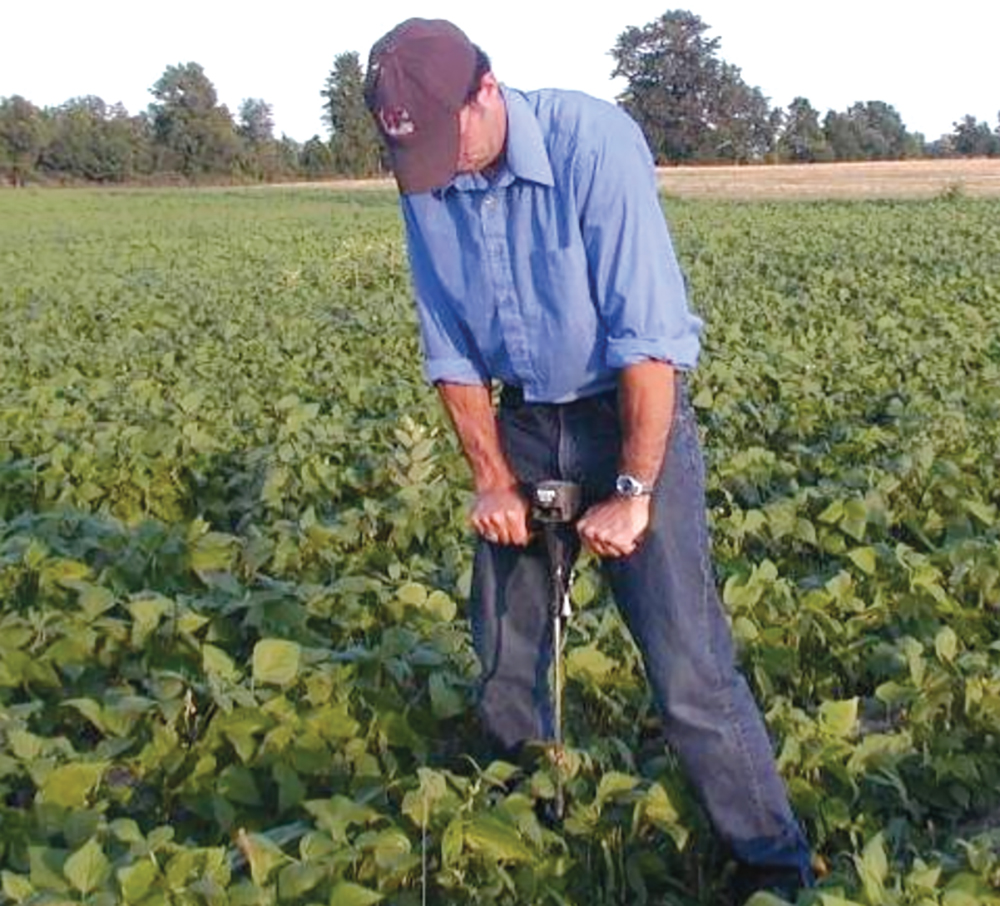
Whenever you try to become more quantitative, you should be aware that measurements naturally vary within a field or may change over the course of a year. For example, if you decide to evaluate soil hardness with a penetrometer (Figure 23.1) or metal rod, you should perform at least 10 penetrations in different parts of the field and be aware that your results also depend on the soil moisture conditions at the time of measurement. If you do this after a dry spring, you may find the soil quite hard. If you go back the next year following a wet spring, the soil may be much softer. You shouldn’t then conclude that your soil’s health has dramatically improved, because what you mostly measured was the effect of variable soil moisture on soil strength. Similarly, earthworms will be abundant in the surface 6–9 inch layer when it’s moist but tend to go deeper into the soil during dry periods, although you may still observe the wormholes and casts (Figure 23.2). Make sure you select your locations well. Avoid unusual areas (e.g., where machinery turns) and aim to include areas with higher and lower yields.
This type of variability with time of year or climatic conditions should not discourage you from starting to evaluate your soil’s health—just keep in mind the limitations of certain measurements. Generally, soil health is best measured in the early spring and late fall under moist (but not too wet) soil condition. But soil health problems are better observed during wet or dry periods when you might see runoff or crop drought stress symptoms.
| Table 23.1. Cropland Soil Health Assessment Worksheet | |||
|---|---|---|---|
| Indicator | Soil health concern | Best time and use | Observation benchmarks |
| Soil cover | Organic matter, organism habitat | Anytime | Greater than 75% surface cover from plants, residue or mulch |
| Residue breakdown | Organic matter, organism habitat | Anytime; mostly no-till; farmer interview | Natural decomposition of crop residues as expected; previous year residues partially decomposed and disappearing |
| Surface crusts | Aggregation | Before tillage; before or early in the growing season | Crusting in no more than 5% of field |
| Ponding | Compaction, aggregation | After rain or irrigation (not when frozen); farmer interview | No ponding within 24 hours after major rainfall or irrigation |
| Penetration resistance | Compaction | With adequate soil moisture; before tillage; before, early in or after the growing season | Penetrometer rating <150 psi in surface layer and <300 psi in subsoil layer, OR slight or no resistance with wire flag inserted |
| Water stable aggregates | Aggregation, organism habitat | Anytime | Water-submerged in glass jar: at least 80% remains intact after 5 minutes with little cloudy water |
| Soil structure | Compaction, soil organic matter, aggregation, organism habitat | Anytime | Granular structure in surface horizon and no platy structure in surface or subsoil horizons |
| Soil color | Organic matter | With adequate soil moisture | No color difference between field and fence row samples, OR value is in darker range using color chart |
| Plant roots | Compaction, organic matter, organism habitat | During growing season | Roots covered in a soil film or part of soil aggregates, OR living roots are healthy (no black/dry roots or lesions), fully branched and extended into subsoil |
| Biological diversity | Organic matter, organism habitat | With adequate moisture; before tillage | More than three different types of organisms observed without magnification |
| Biopores | Organic matter, compaction, aggregation, organism habitat | Before tillage; mostly no-till | Presence of root or earthworm channels that extend vertically through the soil, with some connecting to the surface |
| Source: Modified from USDA (2021) | |||
Table 23.1 provides guidance on good soil health indicators, sampling times and how to interpret measurements, and in the following paragraphs we further clarify the practical considerations.
Soil color is the result of a combination of the soil’s mineralogy, oxidation status and organic matter content. Some soils are naturally more red (highly oxidized iron), brown (less oxidized iron), grey (poor drainage) or whitish (high lime content), but organic matter makes them more dark (see Chapter 2). We therefore associate black soils with high quality, and within the same soil type and texture class you can reasonably conclude that the darker the soil, the better. However, don’t expect a dramatic color change when you add organic matter; it may take years to notice a difference.
Crusting, ponding, runoff and erosion can be observed from the soil surface, as we illustrated in Chapter 15. However, their extent depends on whether an intense rainstorm has occurred, or whether a crop canopy or mulch protected the soil. These symptoms are a sign of poor soil health, but the lack of visible signs doesn’t necessarily mean that the soil is in good health: it must rain hard for these signs to occur. Try to get out into the field sometime after a heavy rainstorm, especially in the early growing season. Crusting can be recognized by a dense layer at the surface that becomes hard after it dries (Figure 15.1). Ponding can be recognized either directly when the water is still in a field depression, or afterward in small areas where the soil has slaked (that is, aggregates have disintegrated). Areas that were ponded often show cracks after drying. Slaked areas going down the slope are an indication that runoff and early erosion have occurred. When rills and gullies are present, a severe erosion problem is at hand. Another idea: Put on your rain gear and actually go out during a rainstorm (not during lightning, of course), and you may actually see runoff and erosion in action. You might notice that most of the runoff and erosion that occurs comes from a relatively small portion of the field, and this may help in remedying the problem. Compare fields with different crops, management and soil types. This might give you ideas about changes you can make to reduce runoff and erosion.
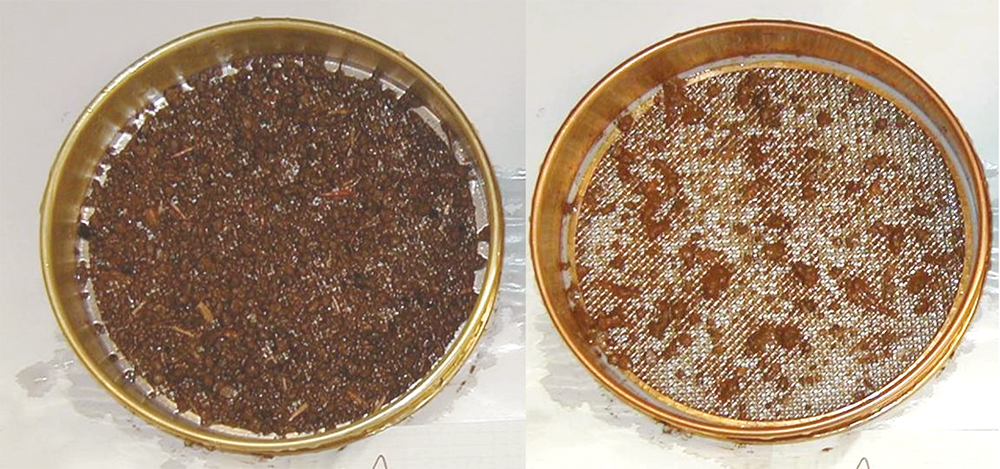
You also can easily get an idea about the stability of soil aggregates, especially those near the surface (see Figure 15.1). If the soil seals readily, the aggregates are not very stable and break down completely when wet. If the soil doesn’t usually form a crust, you might take a sample of aggregates from the top 3–4 inches of soil from fields that seem to have different soil quality (or from a field and an adjacent fencerow area). Gently drop a number of aggregates from each field into separate glass jars that are half filled with water (the aggregates should be completely submerged in water). See whether they hold up or break apart (slake). You can swirl the water in the jars to see if that breaks up the aggregates. If the broken-up aggregates also disperse and stay in suspension, you may have an additional problem with high sodium content (a problem that usually occurs only in arid and semiarid regions).
Soil tilth and hardness can be assessed with an inexpensive penetrometer (the best tool), a tile finder, a spade or a stiff wire (like those that come with wire flags). Tilth characteristics vary greatly during the growing season due to tillage, packing, settling (dependent on rainfall), crop canopy closure and field traffic. It is therefore best to assess soil hardness several times during the growing season. If you do it only once, the best time is when the soil is moist but not too wet (it should be in the friable state). Make sure the penetrometer is pushed slowly into the soil (Figure 23.1). Also, keep in mind that stony soils may give you inaccurate results: the soil may appear hard, but in fact your tool may be hitting a rock fragment.
Soil is generally considered too tough for root growth if penetrometer resistance is greater than 300 psi, but fully unrestricted rooting in the surface layer generally requires soil resistance less than 150 psi. The soil is often harder in the deeper soil layers, and it is common to measure a dramatic increase in resistance when the bottom of the plow layer is reached, typically 6–8 inches into the soil. This indicates subsoil compaction, or a plow pan, which may limit deep root growth. It’s difficult to be quantitative with tile finders and wire, but the soil is generally too hard when you cannot push them in. If you use a spade when the soil is not too wet, evaluate how hard the soil is and also pay attention to the structure of the soil. Is the plow layer fluffy, and does it mostly consist of granules of about a quarter inch in size? Or does the soil dig up in large clumps? A good way to evaluate that is by lifting a spade full of soil and dropping it from about waist height. Does the soil break apart into granules, or does it fall into large clumps? When you dig below the plow layer, take a spade full of soil and pull the soil clumps apart. They should generally come apart easily in well-defined aggregates of several inches in size. If the soil is compacted, it does not easily come apart in distinct units.
Soil organisms can be divided into six groups: bacteria, fungi, protozoa, nematodes, arthropods and earthworms. Most are too small to see with the naked eye, but some larger ones like ants, termites and earthworms are easily recognized. These larger soil organisms are also important “ecosystem engineers” that assist the initial organic matter breakdown that allows other, smaller species to thrive. Their general abundance is strongly affected by temperature and moisture levels in the soil. They are best assessed in mid-spring, after considerable soil warming, and in mid-fall during moist, but not excessively wet, conditions. Just take a full spade of soil from the surface layer and sift through it looking for bugs and worms. If the soil is teeming with life, this suggests that the soil is healthy. If few invertebrates are observed, the soil may be a poor environment for soil life, and organic matter processing is probably low. Earthworms are often used as an indicator species of soil biological activity (see Table 23.1). The most common worm types, such as the garden worm and red worm, live in the surface layer when soils are warm and moist, and they feed on organic materials in the soil. The long nightcrawlers dig near-vertical holes that extend well into the subsoil, but they feed on residue at the surface. Look for the worms themselves as well as their casts (on the surface, for nightcrawlers), and holes are evidence of their presence (Figure 23.2), which are typically greatly enhanced in no-till systems. If you dig out a square foot of soil and find 10 worms, the soil has a lot of earthworm activity. After soaking rains, many worms will come to the surface as the channels and burrows become saturated.
With a little more effort, nematodes, arthropods and earthworms can be removed from a soil sample and observed. Since these soil organisms like their environment to be cool, dark and moist, they will crawl away when you add heat and light. With a simple desk lamp shining on soil in an inverted cut-off plastic soda bottle with a small piece of screen at the bottom (what was the lower part of the bottle top) to keep the soil from falling through (called a Berlese funnel), you will see the organisms escape down the funnel, where they can be captured on an alcohol-soaked paper towel (the alcohol keeps them from escaping). Descriptions of how to make and use a Berlese funnel are readily available on the internet.
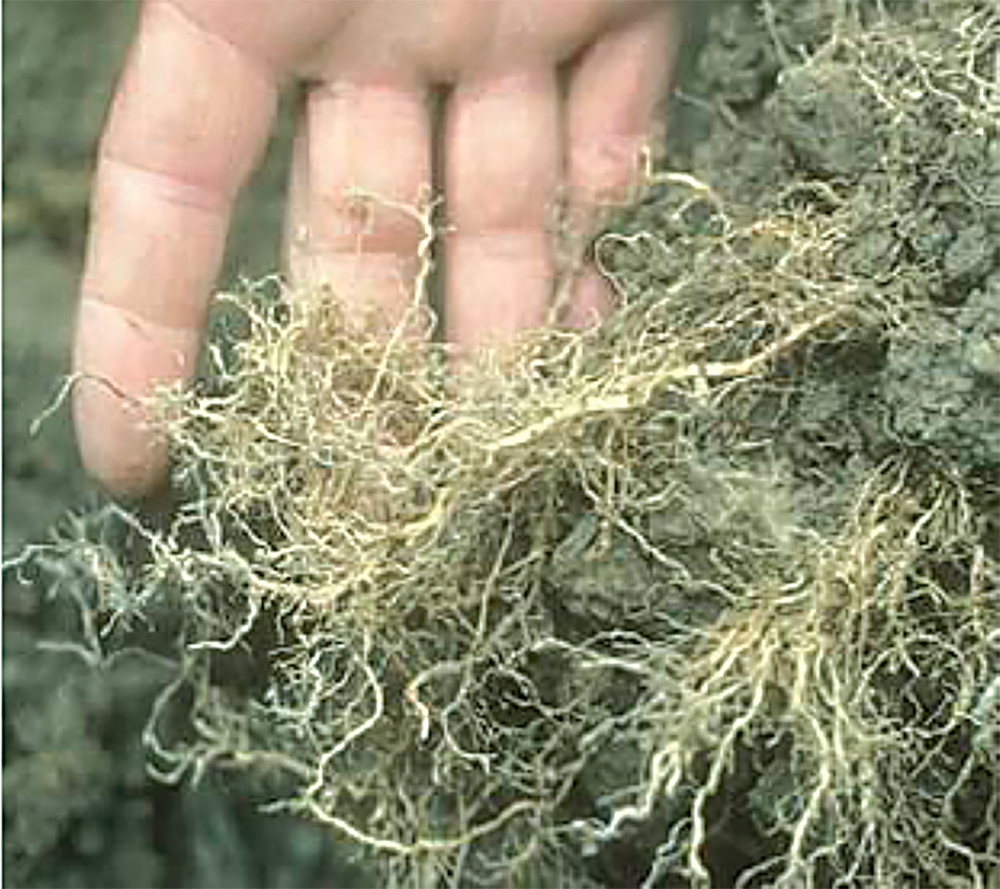
Root development can be evaluated by digging anytime after the crop has entered its rapid growth phase. Have the roots properly branched, and are they extending in all directions to their fullest potential for the particular crop? Do they show many fine laterals and mycorrhizal fungal filaments (Figure 23.3), and will they hold on to the aggregates when you try to shake them off? Look for obvious signs of problems: short stubby roots, abrupt changes in direction when hitting hard layers, signs of rot or other diseases (dark-colored roots, lesions; fewer fine roots). Make sure to dig deep enough to get a full picture of the rooting environment because many times there is a hardpan present.
General crop performance as affected by soil health is most obvious during extreme conditions. During prolonged wet periods, poor soils remain saturated for an extended time, and lack of aeration stunts crop growth. Leaf yellowing indicates loss of available nitrogen by denitrification. This may even happen with high-quality soils if the rainfall is excessive, but it is certainly aggravated by poor soil conditions. Dense, no-till soil may also show greater effects.
Watch also for the onset of drought stress—leaf curling or sagging (depending on the crop type)—and for stunted crop growth during dry periods. Crops on soils that are in good health generally have delayed signs of drought stress. But with poor soils they may show problems when heavy rainfall, causing soil settling after tillage, is followed by a long drying period. Soils may temporarily hardset and stop crop growth altogether under these circumstances.
Nutrient deficiency symptoms can appear on plant leaves when soils are low in a particular nutrient (Table 23.2). (Note that crop nutrient deficiencies can sometimes result from compaction and poor aeration, even though enough nutrients are present in the soil). Many nutrient deficiency symptoms look similar, and they may also vary from crop to crop. In addition, typical symptoms may not occur if the plant is suffering from other stresses, including more than one nutrient deficiency. However, some symptoms on some crops are easy to pick out. For example, N-deficient plants are frequently a lighter shade of green than plants with sufficient N. Nitrogen deficiency on corn and other grasses appears on the lower leaves first as a yellowing around the central rib of the leaf. Later, the entire leaf yellows, and leaves farther up the stem may become yellow. However, yellowing of the lower leaves near maturity is common with some plants. If the lower leaves of your corn plant are all nice and green at the end of the season, there was more N than the plant needed. Potassium deficiencies on corn also show as yellowing on lower leaves, but in this case around the edges. Phosphorus deficiency is normally noted in young plants as stunted growth and reddish coloration. In corn, this may appear early in the season due to wet and cold weather. When the soil warms up, there may be plenty of phosphorus for the plants. For pictures of nutrient deficiencies on field crops, see Iowa State University’s publication Nutrient Deficiencies and Application Injuries in Field Crops (IPM 42).
| Table 23.2 Examples of Nutrient Deficiency Symptoms | |
|---|---|
| Nutrient | Deficiency symptoms |
| Calcium (Ca) | New leaves (at top of plant) are distorted or irregularly shaped. Causes blossom-end rot. |
| Nitrogen (N) | General yellowing of older leaves (at bottom of plant). The rest of the plant is often light green. |
| Magnesium (Mg) | Older leaves turn yellow at edge, leaving a green arrowhead shape in the center of the leaf. |
| Phosphorus (P) | Leaf tips look burnt, followed by older leaves turning a dark green or reddish purple. |
| Potassium (K) | Older leaves may wilt and look scorched. Loss of chlorophyll between veins begins at the base, scorching inward from leaf margins. |
| Sulfur (S) | Younger leaves turn yellow first, sometimes followed by older leaves. |
| Boron (B) | Terminal buds die; plant is stunted. |
| Copper (Cu) | Leaves are dark green; plant is stunted. |
| Iron (Fe) | Yellowing occurs between the veins of young leaves. Area between veins may also appear white. |
| Manganese (Mn) | Yellowing occurs between the veins of young leaves. These areas sometimes appear “puffy.” Pattern is not as distinct as with iron deficiency. Reduction in size of plant parts (leaves, shoots, fruit) generally. Dead spots or patches. |
| Molybdenum (Mo) | General yellowing of older leaves (at bottom of plant). The rest of the plant is often light green. |
| Zinc (Zn) | Terminal leaves may be rosetted, and yellowing occurs between the veins of the new leaves. Area between veins on corn leaves may appear white. |
| Source: Modified from Hosier and Bradley (1999) | |
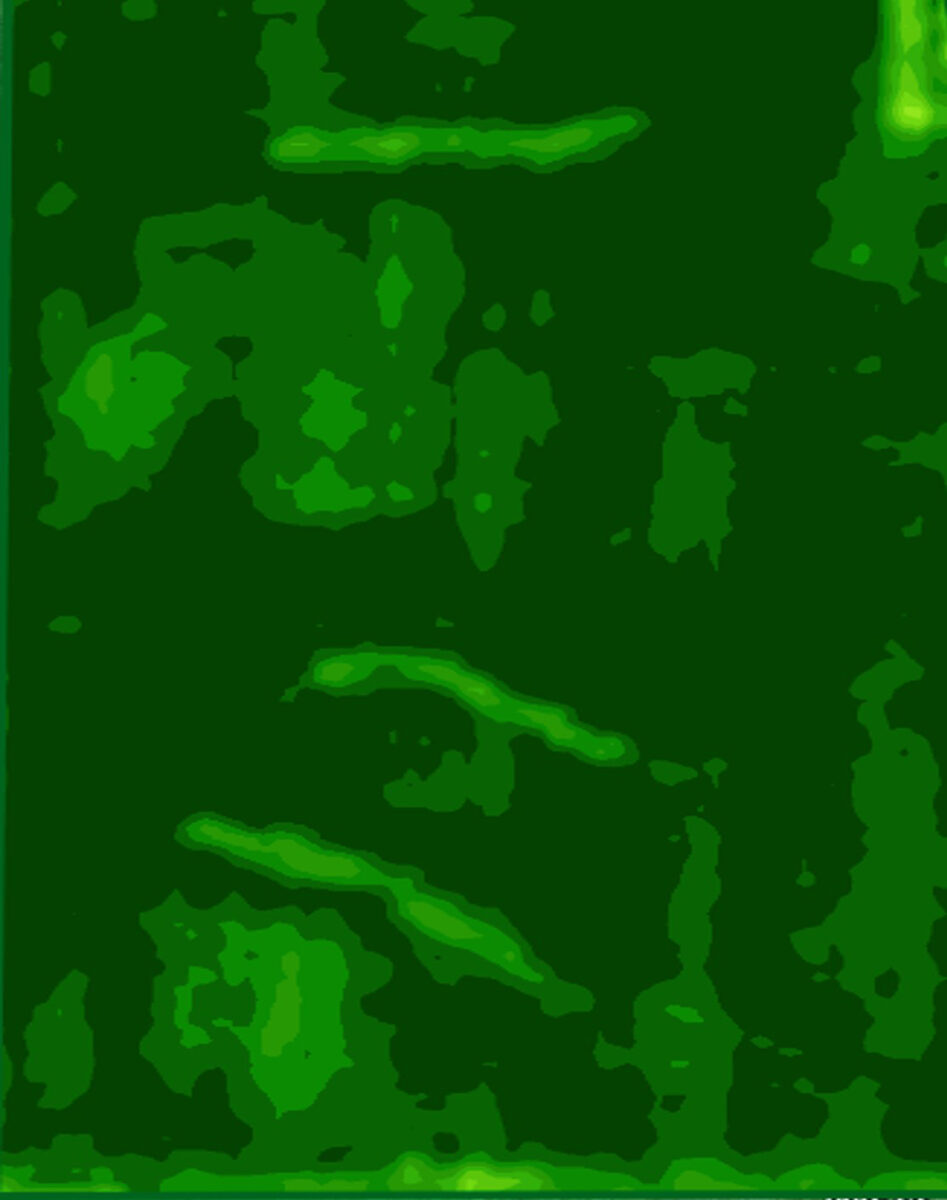
Field images from satellites, aircraft or drones help you see crop performance anomalies and whether certain areas in a field have soil health problems. On a conventional color image, compacted or poorly drained areas show less crop biomass during the early season, i.e., more soil and less crop reflectance in the image. In wet years, areas with poor drainage may exhibit nitrogen deficiencies and appear more yellowish. Vegetation indexes (like NDVI, normalized difference vegetation index) can also help gain insights by showing vegetation density (Figure 23.4). It may not give you a direct cause for the apparent problem, but it will at the least allow you to identify the location and check it out at ground level.
You can evaluate your soil’s health using the simple tools and observations suggested above. Scorecards or assessment worksheets provide a place to record field notes and assessment information to allow you to compare changes over the years.
Laboratory Soil Health Testing
Comprehensive Soil Tests
Growers are used to taking soil samples and having them analyzed for available nutrients, pH and total organic matter by a university, government or commercial lab. In arid regions it is common to also determine whether the soil is saline (too much salt) or sodic (too much sodium). This provides information on the soil’s chemical health and potential imbalances. As we discussed in Chapter 21, you get the most benefit from soil tests with regularly scheduled analyses (at least every two years) and good records. If your soil test report includes information on cation exchange capacity (CEC), you should expect it to increase with higher organic matter levels, especially in coarse-textured soils. And, as discussed in Chapter 20, soil CEC increases after liming a soil, even if there is no increase in organic matter.
| Table 23.3. USDA-NRCS-Evaluated Laboratory Soil Health Indicators and Methodologies, and Associated Soil Processes They Measure | ||
|---|---|---|
| Soil process | Soil health indicator | Method1 |
| Organic matter cycling and C sequestration | Soil organic matter content | Dry combustion Wet oxidation Loss on ignition |
| Structural stability | Aggregation | ARS wet aggregate stability NRCS wet aggregation Cornell sprinkle |
| General microbial activity | Short-term C mineralization | CO2 respired—4 day CO2 respired—24 hours |
| General microbial activity | Enzyme activity | BG NAG Phosphomonoesterases Arylsulfatase |
| C food source | Readily available pool | POXC POM 28-day mineralization WEOC Soluble carbohydrates Substrate-induced respiration Microbial biomass C |
| Biological available N | Available organic N pool | ACE protein WEON Correlation with short-term mineralization 7-day anaerobic PMN 28-day PMN Illinois soil N test NAG Protease |
| Microbial diversity | Community structure | PLFA EL-FAME |
| 1Acronyms are: BG = β-Glucosidase; NAG = N-acetyl-β-D-glucosaminidase; POXC = Permanganate oxidizable C; POM = Particulate organic matter; WEOC = Cold/hot water-extractable organic C; ACE = Autoclaved citrate extractable (protein); WEON = Cold water-extractable organic C; PMN = Potentially mineralizable N; PLFA = Phospholipid fatty acid; EL-FAME = Ester-linked fatty acid methyl ester profile. Source: USDA (2019) | ||
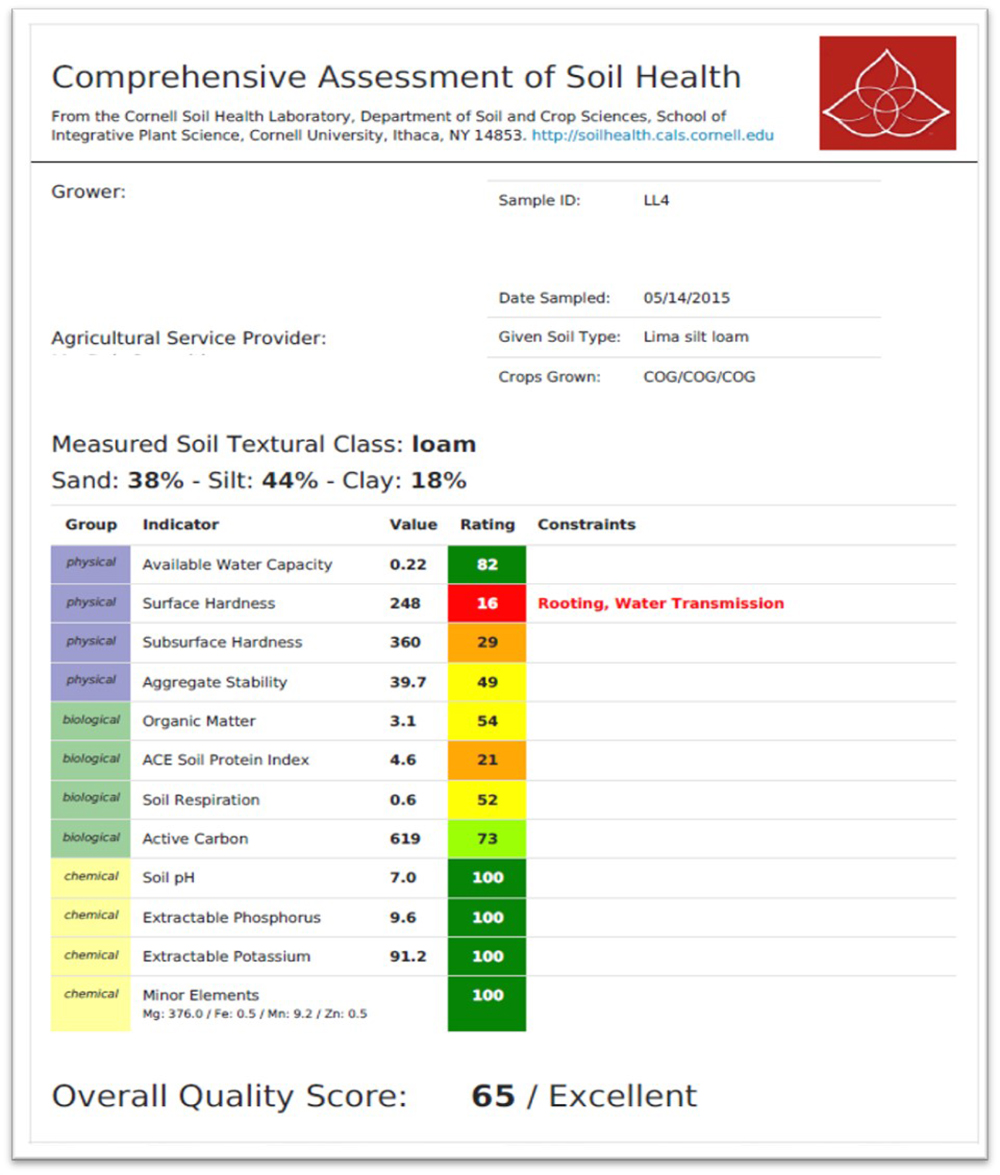
The traditional soil test does not, however, make a comprehensive assessment of soil health, which probably led to the “chemical bias” in soil management. In other words, the widespread availability of good chemical soil tests, although a very useful management tool, may also have encouraged the quick-fix use of chemical fertilizers over the longer-term holistic approach promoted in this book. Several soil health tests have been developed to provide a more comprehensive soil assessment through the inclusion of soil biological and physical indicators in addition to chemical ones. Indicators were selected based on the soil processes that they represent, and thereby the tests provide insights into a soil’s ability to provide ecosystem services (like growing healthy crops). They also consider cost, consistency and reproducibility of the methodologies, as well as relevance to soil management.
In this context, the USDA evaluated a set of indicators and methodologies in an attempt to encourage standardization in soil health testing (Table 23.3). The proposed methods have all proven to provide useful insights into aspects of soil health. Currently (in the year 2020) there is no single standard soil health test, but there is universal agreement that a comprehensive soil health test should include indicators that represent all three types of soil processes: biological, physical and chemical (Figure 23.5). Also, measured values need to be interpreted based on inherent variation in soils as a result of different climates, soil textures, etc.
Some soil health indicators have become more widely adopted. For physical indicators, aggregate stability (Figure 23.6) relates to infiltration, crusting and shallow rooting, and represents the “tilth” of the soil. It generally shows a fast response after the introduction of new management practices like reduced tillage, cover cropping or manure or compost additions. Available water capacity relates to plant-available water and is relevant to drought resistance. It is more sensitive to inherent soil texture differences than to changes in management.
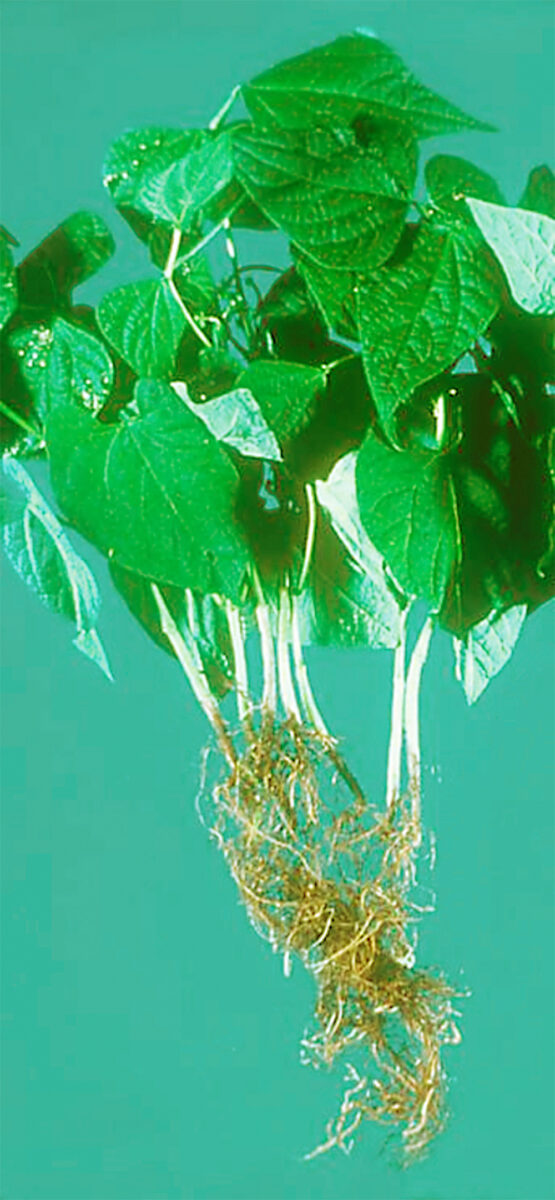
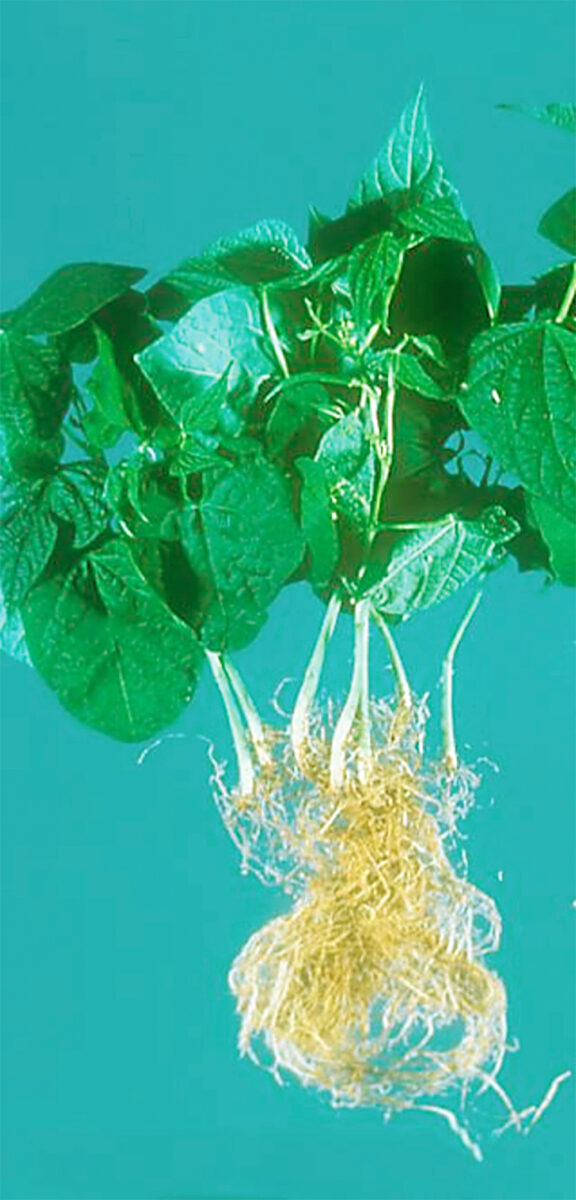
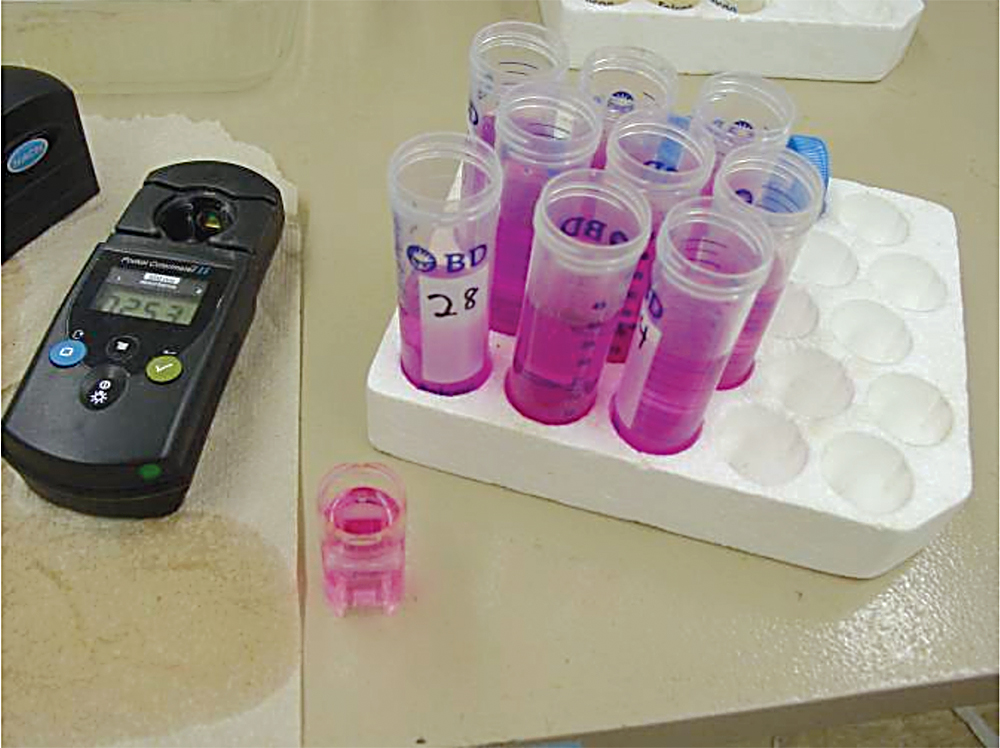
For biological indicators, the most common indicator is total soil organic matter (SOM) content, which affects almost all important soil processes, including water and nutrient retention, and biological activities. It is often the single most important measurement of soil health, but unfortunately it is not very sensitive to management. It takes many years to measure a real change in SOM, and farmers would generally want to know earlier about the benefits of a management change. Active carbon is an inexpensive test that relates to a small fraction of the organic material that is more actively engaged with biological functions, and it has shown to be very sensitive to changes in soil management. It is therefore a good early indicator of soil health improvements. Active C is assessed as the portion of soil organic matter that is oxidized by potassium permanganate, and the results can be measured with an inexpensive spectrophotometer (Figure 23.7). Similarly, soil protein content is an indicator of the soil organic nitrogen potentially available to microorganisms, and it also shows strong response to management changes, especially when more legumes are introduced. Respiration (CO2 released by soil organisms) is widely measured as an indicator that integrates both abundance and metabolic activity of soil microbes; it is also correlated with nitrogen mineralization potential. Ammonia losses from amino sugars in the soil is a related measurement. There are a number of other biological indicators. The bean root rot bioassay provides an effective and inexpensive assessment of root health and overall disease pressure from various sources (plant-parasitic nematodes; the fungi Fusarium, Pythium, Rhizoctonia; Figure 23.8).
Chemical soil health indicators are discussed in Chapter 21 on conventional soil testing and include macro and micronutrients, and soil reaction (pH). Undesirable elements like salts and sodium should be evaluated in arid regions and covered areas, such as inside greenhouses and high tunnels. In urban or industrial environments, toxic elements like heavy metals, salts, radioactive materials, solvents and petroleum products should be considered when assessing soil health, as discussed in Chapter 22.
Interpreting test results is the next step towards identifying specific soil constraints (see Figure 23.5). This particular report (based on the CASH test) is for a soil that had been under grain production for many years. For each indicator, the report provides a measured value and the associated score (1–100), which is an interpretation of the measured result. If scores are low (less than 20), specific constraints are listed. An overall soil health score, also standardized to a scale of 1–100, is provided at the bottom of the report, which is especially useful for tracking soil health changes over time. The test report in Figure 23.6 is somewhat typical for grain production fields in the northeastern United States. It shows the soil in good shape regarding the chemical indicators but severely underperforming with respect to the physical and biological indicators. Why is that the case? In this situation, the farmer was diligent about using the conventional soil test and keeping nutrients and pH at optimal levels. But intensive cropping caused an unbalanced soil health profile for this field. The test identified these constraints and allows for more targeted management, which we’ll discuss in the next chapter.
You might wonder how measured soil health test values are interpreted through scores. In traditional chemical soil tests, the measured values are related to potential crop response (likely yield increase or decline depending on whether it is a nutrient or a toxic element). For biological and physical indicators, scientists have developed normative scoring functions where test results are compared to a larger population of analyzed soil samples in similar soils and cropping systems (similar to how we interpret cholesterol and potassium levels in human blood samples). This approach allows a sample to be scored and interpreted without knowing the precise impact of high or low values. This normative scoring is typically done by calculating mean and standard deviation values for a population group (say, medium-textured soils in grain crop systems in the midwestern United States) and using the cumulative normal distribution function as a fuzzy scoring curve.
Microbial Soil Tests
Soils can also be tested for specific biological characteristics—for potentially harmful organisms relative to beneficial organisms (for example, nematodes that feed on plants versus those that feed on dead soil organic matter) or, more broadly, for macro- and microbiology. Two common tests—the phospholipid fatty acid (PLFA) and fatty acid methyl ester (EL-FAME) assays—have shown sensitivity to management changes and are offered by some commercial soil testing labs. They produce an estimate of the soil’s living biomass. Also, the biomarkers, or signature fatty acids, identify the presence or absence of various groups of interest such as different bacteria, actinomycetes, arbuscular mycorrhizal fungi, rhizobia and protozoa. The relative amounts or activities of each type of microorganism provide insights into the characteristics of the soil ecosystem. Bacterial-dominated soil microbial communities are generally associated with highly disturbed systems with external nutrient additions (organic or inorganic), fast nutrient cycling and annual plants. Fungal-dominated soils are more common with low amounts of disturbance and are characterized by internal, slower nutrient cycling, and high and stable organic matter levels. Thus, the systems with more weight of bacteria than fungi are associated with intensive agricultural production (especially soils that are frequently plowed), while systems with a greater weight of fungi than bacteria are typical of natural and less disturbed systems. The significance of these differences for the purposes of modifying practices is somewhat unclear, but modifying practices causes biological changes to occur. For example, adding organic matter, reducing tillage and growing perennial crops all lead to a greater ratio of fungi to bacteria. Since networks of mycorrhizal fungal filaments help plants absorb water and nutrients, their presence suggests more efficient nutrient and water use. But we generally want to do these practices for many other reasons—improving soil water infiltration and storage, increasing CEC, using less energy, etc.—that may or may not be related to the ratio of bacteria to fungi.
The study of genetic material recovered directly from soil has advanced in recent years. Routinely characterizing the genetic profile of a soil’s organic matter to obtain a picture of the organisms present is thus becoming commercially feasible. It is challenging to extract specific genetic material from soils due to the high complexity of soil organic matter, and DNA profiling is mostly used for descriptive purposes (for example, how prevalent different types of pseudomonas bacteria are). Some tests are showing promise with identifying specific pathogens that may help farmers better manage their fields.
Sensing methods are increasingly considered for soil health assessment. Visible near-infrared and mid-infrared reflectance spectroscopy methods are non-destructive approaches that measure the optical reflectance properties of soil, which is influenced by chemical bonds like O-H (abundant in clay minerals), C-H (abundant in organic matter), etc. They therefore can assess certain soil properties rapidly and at low cost. Such methods appear to be especially efficient when combined with a subset of laboratory-measured properties that can be compared with the spectroscopy results through advanced statistical and machine learning techniques.
Chapter 23 Summary
There are many things to be learned by regularly observing soils and plants in your fields. These include being able to evaluate such important aspects as the severity of runoff, erosion and compaction; root development and health; severe nutrient deficiencies; and the presence of earthworms and other easily visible organisms, among other things. Laboratory evaluations of physical and biological indicators as well as comprehensive interpretation frameworks can also be employed. It is, of course, not enough to know whether a particular limitation exists. In the following (and last) chapter we will discuss both how to put together soil and crop management systems for building healthy soils, and how to address particular issues that may arise from field observations or laboratory analyses.
Chapter 23 Sources
Andrews, S.S., D.L. Karlen and C.A. Cambardella. 2004. The soil management assessment framework: A quantitative soil quality evaluation method. Soil Science Society of America Journal 68: 1945–1962.
Fine, A.K., H.M. van Es and R.R. Schindelbeck. 2017. Statistics, Scoring Functions, and Regional Analysis of a Comprehensive Soil Health Database. Soil Science Society of America Journal 81: 589–601.
Moebius-Clune, B.N., Moebius-Clune, D.J., Gugino, B.K., Idowu, O.J., Schindelbeck, R.R., Ristow, A.J., van Es, H.M., Thies, J.E., Shayler, H.A., McBride, M.B., Wolfe, D.W., Abawi, G.S., 2016. The Comprehensive Assessment of Soil Health. The Cornell framework. soilhealth.cals.cornell.edu.
Norris, C.E., G.M. Bean, et al. 2020. Introducing the North American project to evaluate soil health measurements. Agronomy Journal. doi: 10.1002/agj2.20234.
Sawyer, J., 2010. Nutrient Deficiencies and Application Injuries in Field Crops. Bulletin IPM 42. Iowa State University.
Soil Foodweb, Inc. 2008. www.soilfoodweb.com/.
U.S. Department of Agriculture. 2021. Cropland in-field soil health assessment worksheet. Technical Note No. 450-06.
U.S. Department of Agriculture. 2019. Recommended Soil Health Indicators and Associated Laboratory Procedures. Technical Note No. 450-03.
van der Heijden, M.G.A., R.D. Bardgett and N.M. van Straalen. 2008. The unseen majority: Soil microbes as drivers of plant diversity and productivity in terrestrial ecosystems. Ecology Letters 11: 296–310. Weil, R.R., K.R. Islam, M.A. Stine, J.B. Gruver and S.E. Samson-Liebig. 2003. Estimating active carbon for soil quality assessment: A simplified method for lab and field use. American Journal of Alternative Agriculture 18: 3–17.
